%20(1).svg)
Bench Press: Technique
Originally published on Ph.D Juha Hulmi's blog as the second part of the bench press -series.

M.Sc Exercise Science (Exercise Physiology), University of Jyväskylä
This article covers the technique of bench pressing based on the best research and practical tips that are easy to understand. The article is commented by Juha Hulmi (Associate professor in Exercise Physiology in the University of Jyväskylä) and experienced powerlifters Anna Rytivaara and Timo Hokkanen.

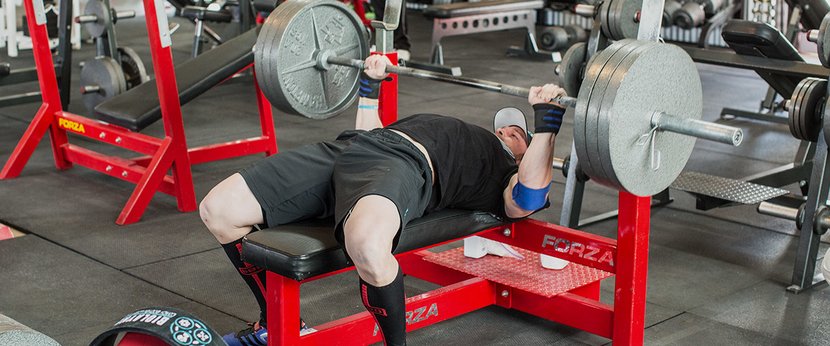
IMAGE 1. Source
Bench Press Technique
The technique of bench pressing can be divided into two parts: Setting up the starting position and the lifting phase itself. The text also covers other details such as the position of the feet, gripping the barbell in the rack, and mental imagery during repetition. Proper bench press technique involves four key points:
1. Keep the shoulder blades pulled together (retracted) throughout the entire repetition.
2. The shoulder blades and hips remain firmly against the bench, with the soles of the feet in contact with the ground.
3. Pull the bar so that it’s directly above your shoulders. Begin lowering the bar. The bar should descend slightly forward, not completely straight down.
4. Elbows stay directly under the bar through the whole repetition.
These key points are achieved through the proper starting position and with the correct control of the barbell’s movement. Next, we will look at the bench press step by step. It's important to note that there are several ways to find the starting position. The science-based method described here is just a one way to to achieve a good starting position.
Setting Up on the Bench and Feet Placement
The correct starting position in the bench press allows safe and efficient pressing while maintaining a stable posture.
The goal is to position yourself on the bench in a way that the barbell is roughly above your nose. This makes it mechanically easy to lift the barbell from the rack, and it prevents the barbell from hitting the rack during the repetition.
Keep your feet either entirely on the ground or only on your toes (in powerlifting, the latter is not allowed). Having your heels on the ground provides a slightly more stable position because a larger surface area of the sole is in contact with the ground, which allows you to utilize your legs more effectively, known as "leg drive." Additionally, you can test the bets position for you by trying to open your toes point outward as shown in the image below. Alternatively, your toes can point in the direction of the bench if using a wide leg stance and toes pointing outward is not feeling good.
You might think what are the benefits when keeping only toes on the ground. The common reason is that pressing only on your toes can create a larger arch in the lower back compared to pressing with your heels on the ground, but the downside is that the "leg drive" is weaker. Anyway, it’s advisable to experiment and determine which one these alternatives feels better for you. Generally, it's recommended to practice bench pressing with your heels on the ground for better support unless your goal is to maximize the arch's height (IMAGE 2).

IMAGE 2. Common feet positions. It's worth trying both positions to see which feels more stable. The important thing is to maintain a tight position throughout the lift. Do not change your feet position during the lift.
After finding the right feet position, take the grip from the barbell. The barbell should be grab in a way that it is close to the base of your thumb, keeping your wrist straight. This avoids wrist flexion during the lift, which would create extra load between the wrist and the barbell. Force is transmitted more efficiently through the forearm to the barbell when the wrist is not flexed. Additionally, wrist flexion can lead to wrist pain. It’s also important to grip the bar as tightly as possible. This makes it easier to keep the wrist straight and helps to keep tension in the forearm muscles.
Proper Shoulder Blade Position
After gripping the bar, pull your shoulder blades tightly together. Bringing the shoulder blades together during the bench press can increase the functional space of the shoulder joint even up to threefold (subacromial space), reducing the risk of shoulder impingement (Solem-Bertoft etc. 1993). As a mental image, you can think of having a pencil between your shoulder blades that you're trying to squeeze. You can practice the correct shoulder blade position as shown in the image below before setting up on the bench (IMAGE 3).

IMAGE 3. Pull the shoulder blades together. Some individuals may find it difficult to control the movement of their shoulder blades. In this case, it's beneficial to practice this with a resistance band. For example, you can attach a resistance band front of you and then pull the resistance band by simply bringing your shoulder blades together. Many people find their lifting position better when they also pull the shoulder blades downward at the same time (scapular depression).
Now when you the correct shoulder blade position, it’s time to set up on the bench. Start by lying on the bench with your feet firmly on the ground and the barbell above your chin. Next, let's focus on getting the upper back position tight, so the barbell is in the right spot directly above your nose. First, lift your upper back off the bench and imagine pulling your shoulder blades towards your ”back pockets”. As the upper body rises, it's easier to bring the shoulder blades closer together. When you set your upper back back onto the bench, your nose should be directly under the bar instead of your chin (IMAGE 4).

IMAGE 4. Setting yourself to the correct starting position occurs in three steps: 1) Lie on the bench with the barbell above your chin. 2) Lift your upper body while bringing your shoulder blades together. 3) Lower your upper back back onto the bench and now your nose should be under the barbell instead of your chin. At this point, you can actively pull your shoulder blades together and towards your ”back pockets”, making the arch and retraction even tighter.
Now your shoulder blades should be firmly together. The arch in your back is also strengthened, increasing the functional space of the shoulder joint and placing it in a better angle for the movement (Gumina etc. 1991).
Taking the Barbell from the Rack
Whether you're taking the barbell from the rack on your own or with a spotter, it’s crucial that the rack is set to the correct height. The most common mistake is pushing the bar too high from the rack, causing the shoulder blades to separate from the position we just took. If the barbell has been lifted incorrectly, getting the shoulder blades back into the right position becomes very difficult. This is why properly taking the barbell from the rack is highly important. Even a spotter should not raise the bar too high, as it can cause the lifter's shoulder blades to lose their retraction.
The correct way to take the barbell from the rack is to "pull" it away. This means you cannot push the barbell upward; instead, imagine pulling the barbell away from the rack, allowing it to rise just enough to get off the rack while keeping the shoulder blades together. Taking the barbell from the rack is also easier when you lift your hips off the bench, take a deep breath, and hold it until the bar is off from the rack and positioned directly above your shoulder joints in the starting position.
Now you can lower your hips back onto the bench and take another deep breath for the actual lift. You can practice getting the barbell directly above your shoulder joints by moving it slightly back and forth parallel to the bench with straight arms. The barbell should feel lightest when it's directly above your shoulder joints (IMAGE 5).

IMAGE 5. Taking the barbell from the rack in three steps: 1) Take a deep breath and grip the barbell tightly. 2) Lift your hips off the bench and pull the bar from the rack. 3) Lower your hips back onto the bench.
The Descent Phase
At this point, you've lifted the barbell from the rack and positioned it correctly above your shoulder joints. Next, fix your gaze straight above the barbell. Maintaining a gaze fixed during the lift makes it easier to push the barbell back to its original position directly above your shoulder joints (similar to a tennis swing where you watch the target where you're hitting the ball, not the racket). You also want to keep your head against the bench so you can concentrate on the barbell's movement, and it's easier to maintain a fixed gaze.
Also, before the repetition, it's important to take a deep breath into your ”stomach” and hold it through the entire repetition. This slightly elevates the thoracic spine and increases the tightness of your posture due to the increased pressure in the abdominal and thoracic cavities. It's important to note that there's no rush to lower the barbell immediately after taking it from the rack. So take your time for breathing and focus before starting to descent the barbell.
You can use two mental images that helps to keep the correct bar path and control of the descent phase. The first mental image is to imagine bending the barbell, which slightly turns your elbows toward your sides (IMAGE 6, on the right). So throughout the descent phase, maintain a strong grip on the barbell while trying to bend it. The second mental image is to imagine pulling the barbell apart in the middle, i.e. spreading your hands away from each other (IMAGE 6, on the left). These mental images help you find the barbell's path during the descent more easily. Additionally, these can help maintain the upper back position more firmly, which is crucial to prevent the breakdown of your tight posture during the repetition.

IMAGE 6. The mental images of pulling the barbell apart and bending it help in finding the correct bar path and keeping the posture tight during the descent.
It's crucial that the descent is controlled. This ensures a consistent point of contact between the barbell and your chest, which is essential in a good technique. McLaughlin & Madsen (1984) found in their study decades ago that experienced lifters lower the barbell more slowly compared to less experienced lifters. Nowadays, there are many exceptions among experienced lifters, as seen in the case of Timo Hokkanen (in the video below) and many others. It's advisable to experiment the optimal speed of the descent phase for you. Some can lower the bar faster than others while maintaining a good control. The speed of the descent can also be influenced by grip width, as a wider grip may require more control. The duration of the descent phase need not be exaggerated, but it typically ranges from 1-3 seconds.
VIDEO. The European record holder in classic bench press in the under 120kg weight class (245 kiloa) Timo Hokkanen, demonstrates a great bench press technique with an extremely fast but controlled descent. An example of a much slower descent phase among famous lifters is Fredrik Smulter, the Finnish record holder in the heavyweight category.
Correct Barbell Contact Point
The point of contact between the barbell and your chest depends largely on your grip width, but generally, the barbell should hit between the lower part of the sternum and the upper part of the pectoral muscles (IMAGE 7). Additionally, when the barbell makes contact with the chest, your elbows should be below the barbell when viewed from the side. Lowering the barbell too close to the shoulders is likely to increase the risk of injury and is not recommended (see Part I). You can learn to standardize the correct point of contact on each repetition by adding a chalk on the middle of the barbell (magnesium that you can rub on your hands to improve your grip). When the barbell makes contact with the shirt, there should always be a thin line of chalk on it. Strive to lower the barbell to the same spot each time, so the line should be thin, unlike when each repetition hits a different spot.

IMAGE 7. The point of contact between the barbell and your chest varies, depending largely on your grip width. Generally, it should be between the lower part of the sternum and the upper part of the pectoral muscles. It's crucial that your elbows are directly below the barbell throughout the repetition.
The Ascent Phase
If you're not training for powerlifting competition, you don't need to practice stopping the barbell on your chest. However, it's a good idea to avoid bouncing the barbell if you want to effectively and safely train your muscles. Although a complete pause isn't necessary, the barbell should still touch your chest before the ascent phase. This helps maintain consistent technique and a maximal range of motion. Moreover, it's easier to move heavy loads when the chest assists in stopping the barbell before the push.
Immediately when the barbell makes a contact with your chest, you can start pushing the barbell upwards maximally (assuming you’re not doing a paused repetition). Since the goal is to push the barbell back to the starting position directly above the shoulder joints, you can aim to push the barbell upward and slightly toward your head. Simultaneously, push your elbows outward but keep them directly below the barbell (IMAGE 8). The paths during the descent and ascent are slightly different, even though the barbell follows an arched trajectory in both phases. In a perfect repetition, the barbell descends in an arch to the chest, whereas in the ascent phase, the barbell immediately moves toward the shoulder joints, resulting in a slightly different path. At the top, the barbell returns directly above the shoulder joints.

IMAGE 8. The correct bar path during the ascent phase is demonstrated in the image. Immediately when the barbell leave from the chest, it moves toward the shoulder joints to make the lift mechanically most efficient for the shoulders. The lower demonstration shows the incorrect ascent phase, often seen in beginners. It’s considerably weaker in terms of power production and biomechanics.
How to Choose the Right Grip Width
Grip width is highly individual and depends on your goals, preferences, leverages, biomechanics, and previous injuries. However, as a starting point, your grip width should be wider than your shoulders and a maximum of about 1.5 times your shoulder width. A wider grip than this may increase the risk of injury (Green & Comfort 2007). A rule of thumb is to choose a grip width so that your forearm is vertical when the barbell is at the bottom of your chest. Afterward, you can experiment with a wider grip if you find it more comfortable. Grip width influences how the load distributes between muscles, where is the optimal contact point to chest, and to optimal bar path. You can read more about this and the relationship between the lever arms in the mechanics section of the first bench press article.
Leg Drive – The Role of Legs in Bench PressIn the bench press, power is generated primarily by the upper body muscles. However, the legs can help stabilize your position. The goal is to push your upper back more firmly into the bench by using your legs, making it easier to maintain the right position for your shoulder blades. You can think of "leg drive" as, pushing your upper body towards the bench press rack. Maintain this tension throughout the lift to prevent your position from breaking down during the repetition. Often, the force generated by the legs is incorrectly directed upward, causing your hips to lift off the bench. The correct way is to produce horizontal force by pushing your body parallel to the bench (IMAGE 9). This keeps your hips touching the bench through the repetition. If your hips easily rise from the bench, it's likely because your feet are too far forward. In that case, slide your heels back further, and your hips will stay on the bench more easily.

IMAGE 9: Push your body towards the bench press rack throughout the entire repetition to maintain the tightest possible position.
General training considerations
In a bench press, breathing is done in the same way as in a squat, for example. Before lowering the bar, draw maximum oxygen and hold your breath throughout the repetition. Re-oxygenate between each repetition, allowing the bar to momentarily stop at the top for the duration. If you are doing a longer set, it is not necessary to retake the oxygen after each repetition. For example, you can hold the oxygen for two reps and only then stop the bar at the top for a moment and pull the oxygen again.
Using an assistant to lift the bar from the rack can be useful, especially with heavier loads, because the shoulders are behind the bar facing away from the sides, which makes it harder to lift the bar and can take away from the lifting itself. The correct height of the bench press rack is also important to get the bar up without breaking the posture.
When learning bench press technique, it is best to keep the weights moderate to focus on strengthening the technique rather than surviving the last repetition. As the technique becomes stronger, the loads can be increased closer to the maximum weights.
The bench press should not be slippery, otherwise the correct position and arc of the shoulder blades will not be maintained. If you feel that the bench is slippery, you can put an exercise mat on top of it or pull two rubber bands parallel around the bench to create friction between the bench and the upper back. Alternatively, you can also put magnesium on the upper back to provide grip. Technical sports shirts are often bad for bench presses as they slip very easily.
"Strength is speed", also applies to bench presses. The more efficient you can get the bar to go up from the chest, the easier the lift will be, as long as you keep your technique good. So try to develop your bench press technique so that you can always get the repetition to go up the bar at maximum speed while maintaining good technique. For example, you can use speed power training to develop an explosive start. For speed bench presses, the extra resistance introduced by rubber bands is handy for reducing the braking at the end of the lift (Hulmi 2003).
In addition to speed strength training, you can use different variations to strengthen your bench press. Variations can be used to emphasise a particular phase of the lift, for example by doing a plank bench press with an assistant holding a wooden block over your chest. In this case, the lift is only half of the lift because the bar only lands on the plank. This variation allows you to train with "oversized" loads specifically for the final push-up phase of the bench press. Variations can also be used to introduce stimulus variation and enhance the development of coordination in the lift itself. However, if the goal is to improve in the bench press, variations cannot be used as the basis for the entire training, but most of the bench press training should be normal full range of motion bench presses (e.g. Martinez-Cava ym. 2019).
Summary and recommendations
As noted, the bench press is a technically demanding movement and it is worthwhile to try to develop the technique as much as possible. Often, even more experienced lifters will get a kick out of the experience of finding that a small change in technique can add pounds to the bar. When starting to train in the gym, it is also worth considering other important factors when programming. You can read more about them in this article.
Remember that warm-up and approach sets are a good place to practice technique with light weights. So focus on doing them with the best technique possible. If you feel that something should be done differently, try making modifications to the technique already in these reps. For example, you could focus on one technique detail mentioned in this article at a time in a single workout. This way, you do not have to and should not try to develop every little detail at once. Ultimately, the correct technique is learned by repeating a movement over several weeks with large enough irons so that the technique stays together with each repetition.
Check out our smart workout coach by clicking here!
Individualized and evidence-based personal training made easily accessible to everyone.


